Showing posts with label handmade. Show all posts

Wednesday, October 5, 2011

ETSY FINDS

(also known as stuff I found that I want)

You know ;)
I must be feeling better... I haven't fake shopped the internets in a while.
My fantasy shopping carts are empty.
I need to get back in the swing of things... the holidays are coming up, and I've got roommates (and myself) to splurge on!!


Now for my etsy finds:

__________________________________________________________________________________


I've been on an earring kick lately.
Please don't look at my most recent pile (TODAY) of receipts from Nordstrom.
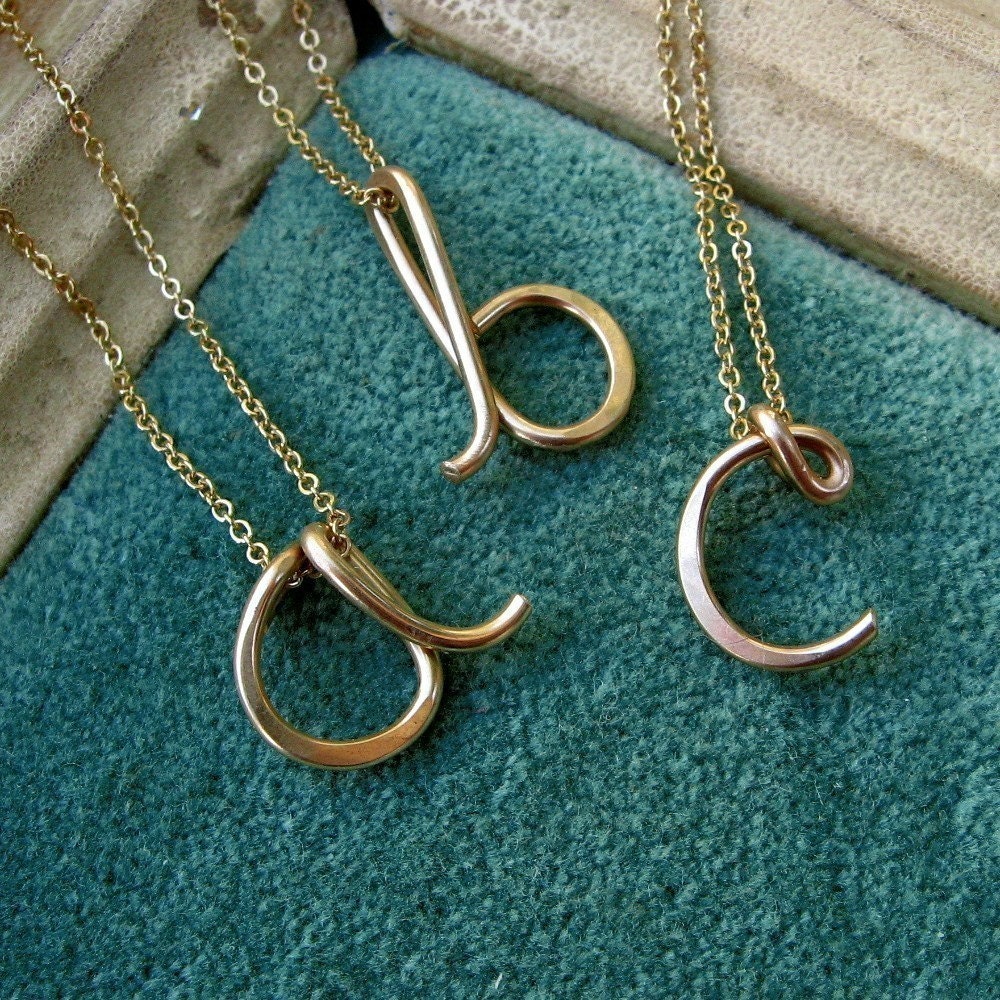

I love the simplicity of these initial necklaces.
I'll take an 'a' please ;)
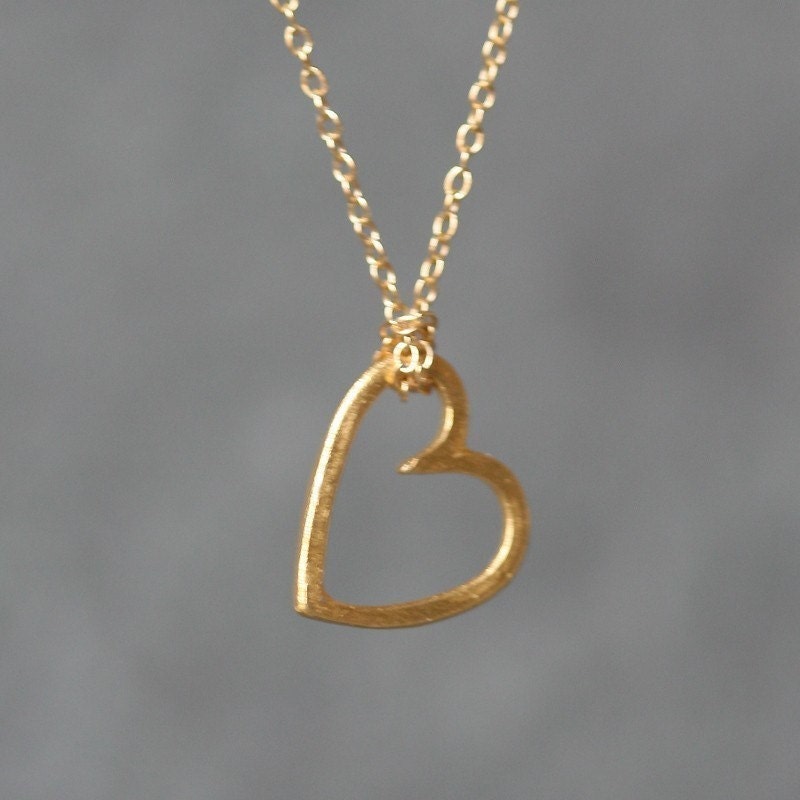

This, I like a lot.
It reminds me of my Gorjana Chloe necklace that I wear every day. It's tiny, and simple.

 Can I just say I am a HUGE HUGE HUGE fan of the Gorjana line (available at Shopbop and the Gorjana website).
I absolutely LOVE all of their pieces!!!
I wish I could add more to my own collection.

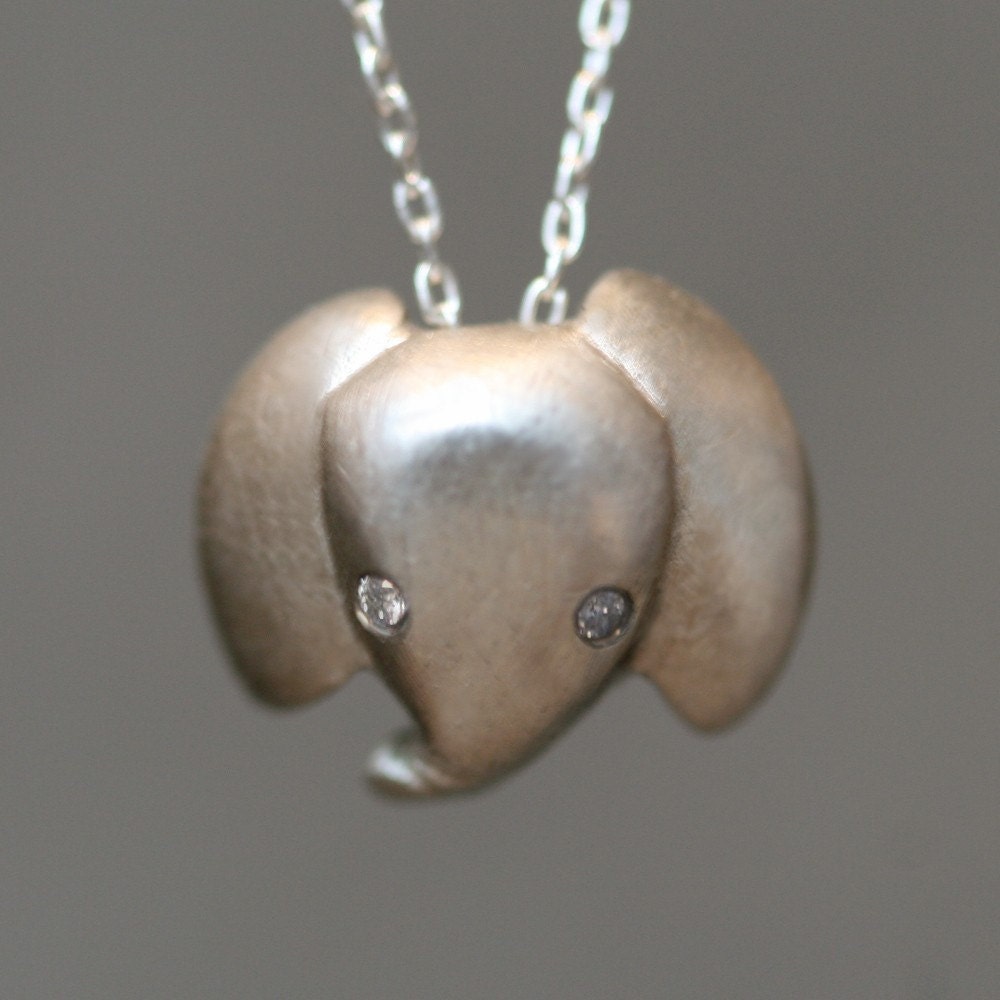
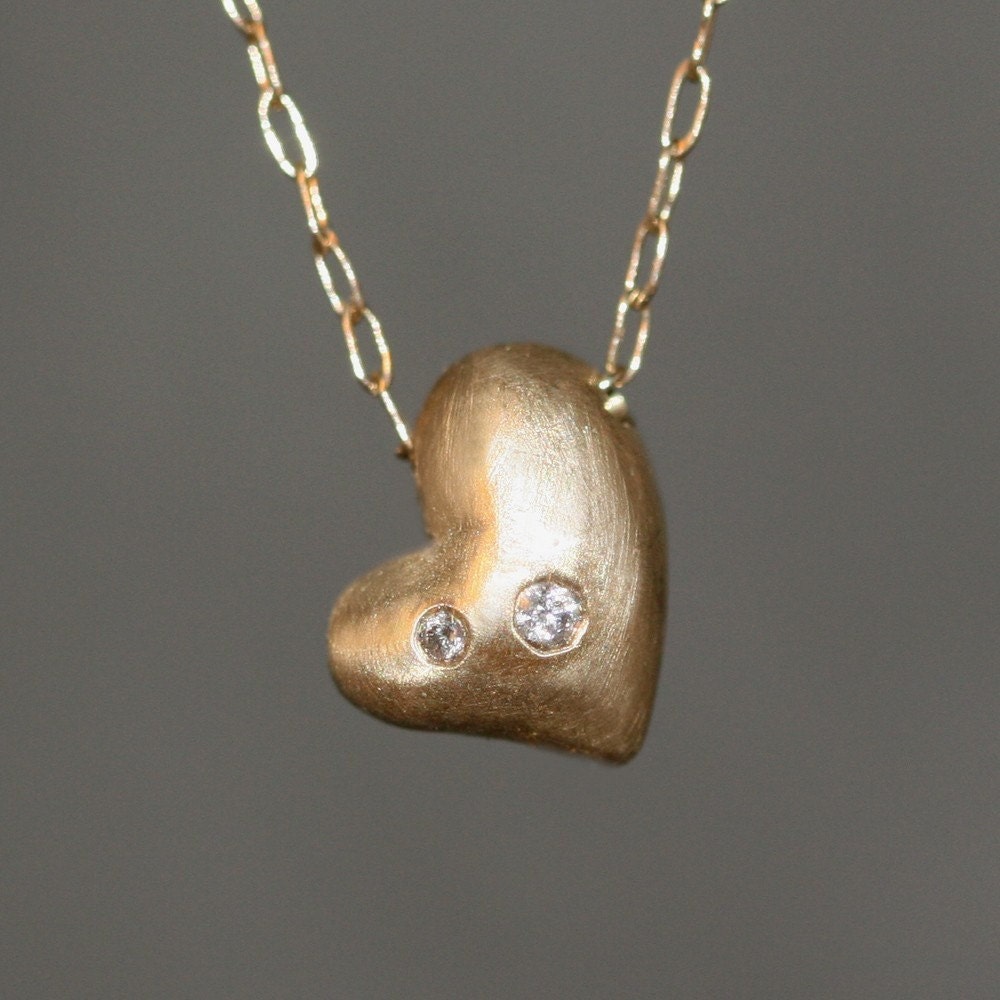
The next three are from the same shop (michellechangjewelry)
I think I love the MAJORITY of her pieces...
I can't decide which I like more:


(You pick the initials, but I kind of like 'xo')


Have you found any thing on Etsy lately?

Saturday, June 11, 2011

Mini Wallet Giveaway

Well, forgetful little me forgot that I was going to do a giveaway this week. I know I just wrapped one up last week, but I did say a while back I'd giveaway the mini wallet I made for the tutorial so I figured I better get on it before anyone decides to eat me. So without any further ado...

The Prize:

The prize for this giveaway is the mini wallet made oh-so-famous in the mini wallet tutorial. It has 2 pockets for credit cards, IDs, coffee punch cards, and anything else your heart desires, and 1 pocket for cash. Remember, this is a mini wallet, so you'll have to fold your cash in half to put it in the wallet.

Who can Enter:
-Anyone. I don't care if you live on Pluto. Well, actually I think shipping to Pluto might cost a lot, so on second thought I'm limiting this giveaway to residents of the planet Earth. Sorry, aliens.

How to Enter (all entries are optional; do as many or as few as you like):
-Follow this blog with Google Friend Connect.
-Follow this blog on BlogLovin'.
-Tweet about this giveaway. (Include link in comment)
-Blog about this giveaway. (Include link in comment)
-Share it on facebook. (Include link in comment)

You can leave your entries in separate comments or in the same one if you like. Maximum of 5 entries per person. Please include a method of contact in at least one of your comments (a blog URL or email address is acceptable).

Giveaway closes Friday, June 17th at 9pm PST. Winner will be selected with the random # generator.

Friday, June 3, 2011

Mini Wallet Tutorial

Yay! It's finally here! Do you guys have your sewing machines out and ready to roll?

Before we begin, let me just say I am sorry for how picture heavy this post is. I am, however, the type of person that learns by seeing, and nothing drives me crazy more than a tutorial with only 1 picture every 5 steps or so. I like to see pictures for every single step. So if that's you, you'll enjoy this. If that's not you, well then, I suppose I'm sorry. But not really.

Click on any image to make it bigger.
Outer Fabric - The fabric I like to use for this is from the Home Decor section at Joann Fabrics. It's 100% cotton, but it's a heavier weight and more durable than plain cotton.

Lining Fabric - I just use plain, thin cotton for this. Your wallet is going to be pretty bulky around the edges by the time you're done sewing it, so try to go as thin as possible to avoid adding any extra bulk you don't need.

OK, you ready? Let's go.

1. Cut your fabric into 8 pieces (4 from the outer and 4 from the lining) matching the measurements below.
2. Set aside the 7x5.5 pieces. Match up the rest of the pieces according to size. Lay them on top of each other right sides together.
3. Sew each section together along the longer (5.5 inch) edge using a 1/2 inch seam allowance. 
4. Open up each section and iron the seam allowance to one side, and then fold along the seam and iron again. Do this on all 3 sections.
5. Get your large, 7x5.5 inch piece of lining fabric and lay it out right side up.
6. Lay the 3 smaller sections you just finished sewing and ironing, right sides up, on top of the lining piece in order of height. Lay down the tallest first, then the second tallest, then the shortest. The finished edges should be on top, and the raw edges should all line up across the bottom.
 7. Lay the large (7x5.5) outer fabric on top of this stack right side down.
8. Pin the bottom half together. If you laid everything out right you should be pinning through 8 pieces of fabric, so it'll be trickier than usual to pin it. 
9. OPTIONAL: Before you pin the top half, cut small triangles from the top corners.This will give the front flap of your wallet a little more shape.
10. Finish pinning around the top. Leave at least a 2 inch gap on the right side. 
11. Sew all layers together, except for the marked gap, using a 1/2" seam allowance. 
 12. Snip a small amount off the bottom two corners. Be careful not to get too close to your seam.
13. Turn the entire wallet inside out through the 2 inch gap. I know this can be tricky, but just go slowly and try not to tug too much or you may burst your seams. Once it's turned inside out use your fingers to push out the corners and make it as flat as possible.
14. Iron the life out of it. 
15. Make sure the raw edges where your 2 inch gap is are tucked inside. If they are sticking out or are folded funny, straighten them out, tuck them inside, and iron to hold it in place. 
16. Put two pins just above the tallest pocket. These are your "don't sew past this point" guides.
17. Now the scary part! Top stitch around the top half of the wallet, stopping before you cross the pins. Technically speaking you could top-stitch all the way around the wallet, but chances are your machine can't sew through that many layers without busting into flames or something like that. 
Remember that when you top stitch you want to stay very close to the edge of the fabric. To keep myself in a (relatively) straight line, I try to line up the edge of the fabric with the side of the hole in the center of the presser foot. The main goal here is to be sure that you're sewing close enough to the edge to sew over the raw edges where your 2 inch hole still is. If you sew too far in, you won't get them and they'll pop out and fray. 

When you're done it should look like this:
18. Double check that the formerly open gap is now sewed securely shut. Give yourself a pat on the back if it is. If not, it's time to familiarize yourself with my good friend the seam ripper and do it again. (My first mini wallet got top stitched about 4 times before I was satisfied with it, so no worries if you don't get it the first time).


19. Fold down the front flap and iron it. 
20. Almost there! The last step is to attach your closure of choice. Follow the given instructions on the packaging of the item you bought to add it to the wallet. Check, double check, and triple check that everything is lined up correctly before committing to anything.
 21. Jump up and down with joy, because you're done!
So that's it! I know that's a lot of pictures and a lots of steps, but it's really easier than it looks. Like I said before, I'm the type that likes to be babied through projects like this, so it's my personal preference to have each step outlined and have a picture for everything. I hope it all made sense! If you have any questions or suggestions to make this better/easier, feel free to leave them in the comments and I'll try to get back to you. And of course, if you make a mini wallet, please show me! Post a picture on your blog and let me know about it, or send me a picture via email to violetreaction@live.com. Happy sewing!

Tuesday, May 31, 2011

The Last Hurrah

I'm just going to tell you right now that I got a little crazy editing pics today. Don't say I didn't warn you.

Today I'm wearing my oh-so-glorious Kork-Ease, and let me tell you something: my feet are happy. Who knew that such clunky shoes could be so comfy? Also worthy of note is the skirt, which while strikingly similar to this skirt, is not the same. I decided that the other one was probably a little too yellow for my skin tone, so I went back to the fabric store and got a more neutral tone. It's a bit more easy on the eyes, I think.
Cardigan: Target --- Top: F21 --- Belt: Thrifted --- Skirt: Handmade --- Shoes: ShoeBuy.com --- Purse: Etsy/Bombshell Bettie's Vintage --- Rose Brooch: Etsy/Brydferth --- Ring and Earrings: Handmade
I wish I could report back to you guys that I stayed strong in the face of temptation and didn't buy any of the shoes in my previous post, but that simply would not be true. I did decide, however, that the pair I treated myself to would be my last. OK, so not forever, but at least for a while. I have practically every color and practically every style of shoe there is to own, so I'm biding farewell to shoe shopping. I've just added a little text box in the sidebar to keep track of how long I last. Wish me luck, and above all else, DO NOT send me links to any cute shoes. :)

PS. Don't forget to enter the Brydferth giveaway!

Monday, May 23, 2011

Little Red Couch

A few of you guys commented on my post yesterday wondering how I do indoor pictures without them looking 100% terrible (I'm paraphrasing). The answer is that I just happen to be super lucky and work in a shop that has awesome track lighting, so I can get great lighting as long as stand in the right spot. Obviously I don't use flash - an evil creation if there ever was one - and then I just do a bit of brightening and color fixing on my computer to make them a tad less dark and yellow.

I really do prefer outdoor pictures, though. It's just that my current situation doesn't allow for me to go running around outside, so I make do with what I have.
Blazer: F21 --- Top and Belt: Thrifted --- Skirt: Handmade --- Purse: Target
Rings: Handmade --- Shoes: Payless
This is my favorite couch ever. We have it in the shoe section so wee little lads and lasses can have a proportionate place to sit while their mom's shove shoes on their feet. I kid of feel like a giant sitting on it, but I basically am I giant no matter what chair I sit in so that's nothing new.

Anyways, I hope you all had lovely weekends. Mine was pretty boring, but I suppose there's nothing wrong with a boring weekend every now and then. You would think with all the bored time I had, I would have done a mini wallet tutorial like I said I would, but yeah... I'm not even going to try and make an excuse for why I didn't. Are you still dusting your sewing machines? It's OK, you can probably stop that now.

And one quick question before I leave you....What is your favorite eyeshadow? I'm on the hunt for a neutral (nothing colorful, just some nice shimmery skin tones and browns) pallet, preferably a trio or quad, but a duo would be OK too if it was super awesome. I've tried most of the available options at Target and haven't found any that I like yet, so if you have a favorite that you really like, please let me know and I'll check it out!

Wednesday, May 18, 2011

The Case of the Missing Earring

Earring: Charlotte Russe --- Cardigan and Top: UO --- Belt: Forever21 --- Skirt: Thrifted --- Wedges: Kohls --- Clutch: Etsy/58BlueBirds
Man oh man, this skirt is like my #1 favorite thrift find ever. How much do I love it? I'm not sure exactly, but I loved it enough to buy it even though it was about 5 sizes too big for me and barely stayed up over my hips. I begged my mom to fix it for me, so she, being the genius she is, cut holes on the inside of the waistband and put some elastic through it. Now it fits perfectly around my waist. Y'all should be jealous she's my mom an not yours.

Did I mention it's Nicole Miller? It is was only $3? Because it's both! It's a thrifting score for the ages.
This morning when I got to work I noticed something weird. On one ear, I had an earring. On the other, I didn't. There are 3 possibilities of what happened to said missing earring.
1) I only put one on because I was thinking about unicorns or some other deeply interesting thing like that.
2) I did put the 2nd one off, but it fell off sometime between when I put it on (duh) and when I looked in the mirror at work (doubly duh).
3) The monster that lives in my ear ate it.
The world may never know.

Yesterday I made myself a new baby wallet. I've been getting tired of having to empty out my regular sized wallet every time I use a small clutch, so I finally got around to making myself a miniature one that will fit in any and all of my purses.
So I know several of you guys asked for a tutorial on the skirts I've been making, and I still want to do one of those in the future, but would you be interested in a mini-wallet tutorial? They're actually really simple and take only about 15-20 minutes to make once you get the hang of it. And they're super cheap, too, because they don't use much fabric. Anyways, let me know if you'd be interested, and based on your responses I may or may not do one.

Tuesday, May 10, 2011

Minty Fresh

Top: Anne Taylor Loft --- Belt and Skirt: Thrifted --- Shoes: Kohls --- Earrings and Ring: Handmade --- Bracelet: Charlotte Russe --- Purse: Etsy/58bluebirds
You know what I realized this morning? I have no blue or green shoes. It's a tragedy. I must resolve this situation as soon as possible.

I am feeling very optimistic about the weather today. It's forecast to be 67-freaking-degrees today, and though so far it's sitting comfortable around only 50, I am hopeful that I did not wear a nearly sleeveless top in vain.
This belt is seriously going in the "Favorite Thrift Finds Ever" category (don't ask me what else is in that category... I just made it up). The shade of mint is perfect, and it fits me perfectly. And for only $2? Yes pleaassse.

This morning I made the rookie mistake of forgetting to tell my new co-worker Sherri that I was going to work today and need tomorrow off. So I was sitting at the desk this morning around 9:45 when in walks Sherri, and I instantly start to feel stupid. Like really, really stupid. Hopefully I was just getting all of the stupid out early so now I'll do nothing dumb for the rest of the day. Not likely, but I can hope, right? Anyways, it turned out fine because (a) she didn't yell at me for making her come in to work for nothing and (b) she can work tomorrow. Crisis averted.