Showing posts with label sewing. Show all posts

Friday, June 3, 2011

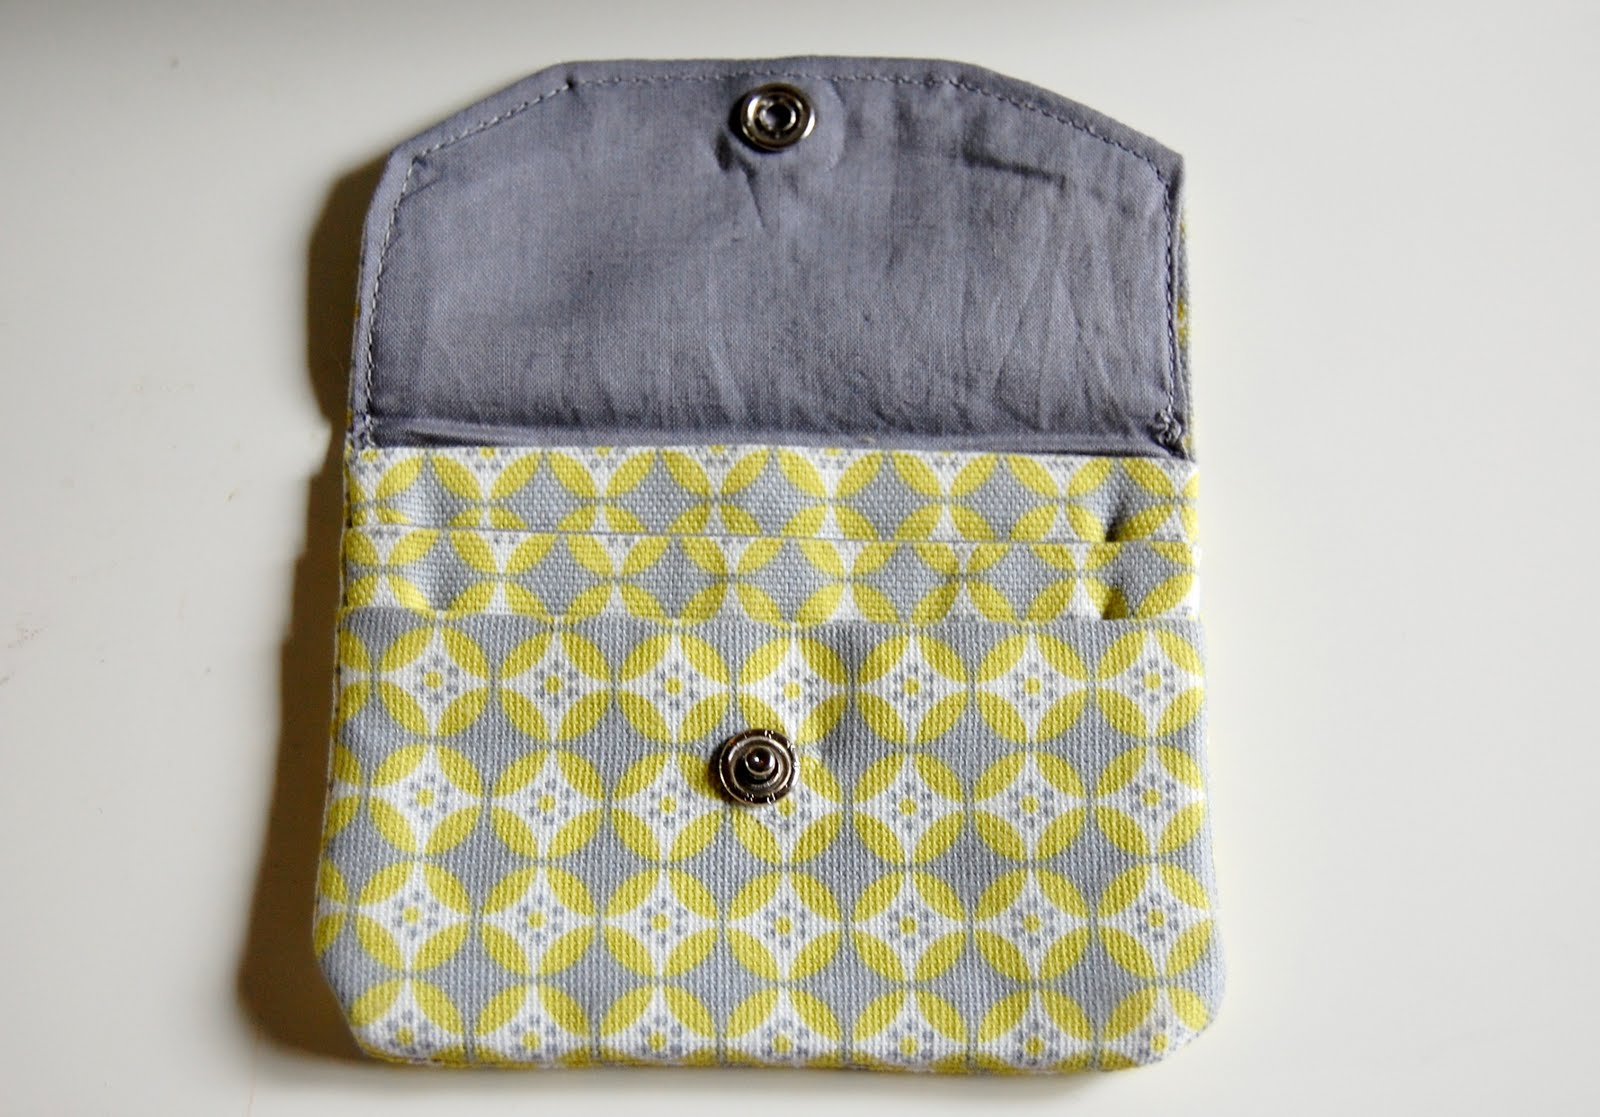
Mini Wallet Tutorial

Yay! It's finally here! Do you guys have your sewing machines out and ready to roll?

Before we begin, let me just say I am sorry for how picture heavy this post is. I am, however, the type of person that learns by seeing, and nothing drives me crazy more than a tutorial with only 1 picture every 5 steps or so. I like to see pictures for every single step. So if that's you, you'll enjoy this. If that's not you, well then, I suppose I'm sorry. But not really.

Click on any image to make it bigger.
Outer Fabric - The fabric I like to use for this is from the Home Decor section at Joann Fabrics. It's 100% cotton, but it's a heavier weight and more durable than plain cotton.

Lining Fabric - I just use plain, thin cotton for this. Your wallet is going to be pretty bulky around the edges by the time you're done sewing it, so try to go as thin as possible to avoid adding any extra bulk you don't need.

OK, you ready? Let's go.

1. Cut your fabric into 8 pieces (4 from the outer and 4 from the lining) matching the measurements below.
2. Set aside the 7x5.5 pieces. Match up the rest of the pieces according to size. Lay them on top of each other right sides together.
3. Sew each section together along the longer (5.5 inch) edge using a 1/2 inch seam allowance. 
4. Open up each section and iron the seam allowance to one side, and then fold along the seam and iron again. Do this on all 3 sections.
5. Get your large, 7x5.5 inch piece of lining fabric and lay it out right side up.
6. Lay the 3 smaller sections you just finished sewing and ironing, right sides up, on top of the lining piece in order of height. Lay down the tallest first, then the second tallest, then the shortest. The finished edges should be on top, and the raw edges should all line up across the bottom.
 7. Lay the large (7x5.5) outer fabric on top of this stack right side down.
8. Pin the bottom half together. If you laid everything out right you should be pinning through 8 pieces of fabric, so it'll be trickier than usual to pin it. 
9. OPTIONAL: Before you pin the top half, cut small triangles from the top corners.This will give the front flap of your wallet a little more shape.
10. Finish pinning around the top. Leave at least a 2 inch gap on the right side. 
11. Sew all layers together, except for the marked gap, using a 1/2" seam allowance. 
 12. Snip a small amount off the bottom two corners. Be careful not to get too close to your seam.
13. Turn the entire wallet inside out through the 2 inch gap. I know this can be tricky, but just go slowly and try not to tug too much or you may burst your seams. Once it's turned inside out use your fingers to push out the corners and make it as flat as possible.
14. Iron the life out of it. 
15. Make sure the raw edges where your 2 inch gap is are tucked inside. If they are sticking out or are folded funny, straighten them out, tuck them inside, and iron to hold it in place. 
16. Put two pins just above the tallest pocket. These are your "don't sew past this point" guides.
17. Now the scary part! Top stitch around the top half of the wallet, stopping before you cross the pins. Technically speaking you could top-stitch all the way around the wallet, but chances are your machine can't sew through that many layers without busting into flames or something like that. 
Remember that when you top stitch you want to stay very close to the edge of the fabric. To keep myself in a (relatively) straight line, I try to line up the edge of the fabric with the side of the hole in the center of the presser foot. The main goal here is to be sure that you're sewing close enough to the edge to sew over the raw edges where your 2 inch hole still is. If you sew too far in, you won't get them and they'll pop out and fray. 

When you're done it should look like this:
18. Double check that the formerly open gap is now sewed securely shut. Give yourself a pat on the back if it is. If not, it's time to familiarize yourself with my good friend the seam ripper and do it again. (My first mini wallet got top stitched about 4 times before I was satisfied with it, so no worries if you don't get it the first time).


19. Fold down the front flap and iron it. 
20. Almost there! The last step is to attach your closure of choice. Follow the given instructions on the packaging of the item you bought to add it to the wallet. Check, double check, and triple check that everything is lined up correctly before committing to anything.
 21. Jump up and down with joy, because you're done!
So that's it! I know that's a lot of pictures and a lots of steps, but it's really easier than it looks. Like I said before, I'm the type that likes to be babied through projects like this, so it's my personal preference to have each step outlined and have a picture for everything. I hope it all made sense! If you have any questions or suggestions to make this better/easier, feel free to leave them in the comments and I'll try to get back to you. And of course, if you make a mini wallet, please show me! Post a picture on your blog and let me know about it, or send me a picture via email to violetreaction@live.com. Happy sewing!

Thursday, June 2, 2011

Leanna Loves...

1. This Video (a must see for any Indiana Jones fans out there)


2. This Apron
Stephanie of Stuph's Stuff held a giveaway on her blog a few weeks back, which I entered and did not win. In her post congratulating the winner, however, Stephanie graciously offered to send a consolation prize to those that entered and didn't win. Obviously I am completely unable to pass up an offer as awesome as that, so I quickly wrote her with my address, and then this freaking adorable handmade apron showed up on my mailbox a while later. Isn't it perfect? And it's reversible, too. Now I'm feeling like cooking something just so I can have an excuse to wear it. Too bad I don't know how to cook.

3. This Wallet
I finally got around to doing my mini wallet tutorial! I'll work on editing the pics and doing instructions tonight and hopefully will have the post ready to go up tomorrow.

4. This Game/Music-Thingee
I found this on StumbleUpon and find it strangely addicting for some reason. It's called Tone Maxtrix. You start out with a blank black grid, and you just click on the boxes and they make noise. I can't really describe it, so check it out HERE to see the awesomeness for yourself.

5. This Movie
The word on the street (i.e. the internet) is that a lot of people who read the book weren't too pleased with the movie, but I've never read the book so I was able to enjoy the movie for what it was. That's not to say I didn't think it was totally weird, though. The only thing I knew about this movie is that it had Carey Mulligan and Keira Knightley in it, so when it started in on all the organ donation stuff it hurt my mind a little bit. The whole thing is rather dreamy, though, and I ended up really liking it.

Wednesday, May 18, 2011

The Case of the Missing Earring

Earring: Charlotte Russe --- Cardigan and Top: UO --- Belt: Forever21 --- Skirt: Thrifted --- Wedges: Kohls --- Clutch: Etsy/58BlueBirds
Man oh man, this skirt is like my #1 favorite thrift find ever. How much do I love it? I'm not sure exactly, but I loved it enough to buy it even though it was about 5 sizes too big for me and barely stayed up over my hips. I begged my mom to fix it for me, so she, being the genius she is, cut holes on the inside of the waistband and put some elastic through it. Now it fits perfectly around my waist. Y'all should be jealous she's my mom an not yours.

Did I mention it's Nicole Miller? It is was only $3? Because it's both! It's a thrifting score for the ages.
This morning when I got to work I noticed something weird. On one ear, I had an earring. On the other, I didn't. There are 3 possibilities of what happened to said missing earring.
1) I only put one on because I was thinking about unicorns or some other deeply interesting thing like that.
2) I did put the 2nd one off, but it fell off sometime between when I put it on (duh) and when I looked in the mirror at work (doubly duh).
3) The monster that lives in my ear ate it.
The world may never know.

Yesterday I made myself a new baby wallet. I've been getting tired of having to empty out my regular sized wallet every time I use a small clutch, so I finally got around to making myself a miniature one that will fit in any and all of my purses.
So I know several of you guys asked for a tutorial on the skirts I've been making, and I still want to do one of those in the future, but would you be interested in a mini-wallet tutorial? They're actually really simple and take only about 15-20 minutes to make once you get the hang of it. And they're super cheap, too, because they don't use much fabric. Anyways, let me know if you'd be interested, and based on your responses I may or may not do one.

Monday, April 25, 2011

Outfit: For the Love of Yellow

Necklace: Target --- Top & Purse: Forever21 --- Belt: Thrifted --- Skirt and Rings: Handmade --- Sandals: Urban Outfitters
Today I am declaring that yellow is my new favorite color. I love it with blue, I love it with green, I love it with orange... I love it! The color of this skirt isn't quite as mustard-y as I was going for, but I like it anyways because it's still yellow. 

Making all these skirts is infectious... I've made all three that I bought fabric for and all I want to do is go buy more fabric to make more of them. All things considered they're pretty cheap. Between the fabric, thread, and elastic I'd say each one costs about $10. It's not as cheap as thrifting them, but it's way cheaper than buying from a store. Plus I get to pick out the fabric with is mountains of fun. With thrifting and regular shopping you just have to keep your fingers crossed that you'll find something with a sweet print or color. With sewing you know you'll get a sweet print or color.
If you have a foot phobia or something, I apologize. I just really like the straps on these sandals and wanted to show them off. :)

Green Glass Ring, Olive Swarovski Ring, Blue Kyanite Ring
Scored this necklace on the clearance rack at Target for $4.48 or something ridiculously cheap like that. Thanks, Target!
Coat: ModCloth

Saturday, April 23, 2011

Outfit: Easter Bunny

Necklace and Top: Forever21 --- Belt: Thrifted --- Skirt: Handmade --- Wedges: Kohls --- Rings: Handmade

I made this skirt last night and was pleasantly surprised at how much quicker it was than the first two that I made. I'm basically a professional now.

Several of you guys asked for a tutorial on this skirt on my last handmade skirt post, but I have to admit I use a pattern for this so the tutorial wouldn't be very original. I could tell you guys how to make one in my size, but I have no clue how to alter it for different sizes. I'll try and figure something out and maybe do a tutorial down the road, but don't hold your breath.
Coat: ModCloth

Rings

Today the Easter Bunny came to work!
Not me, thank goodness.
The bunny being making friends. No, we don't know this guy.
I briefly considered putting this on my head to see what Dee had to put up with for 2 hours but decided against it. It looked scary.
My bosses mom came down to the shop today to dress up as the Easter bunny and pass out candy to the kids that came through. When there were breaks in the action, we would sit around and talk, and let me tell you something: it is weird to talk to someone wearing a bunny suit. Words to live by.

Wednesday, April 20, 2011

Outfit: Rosey Posey

Top, Necklace, & Purse: Forever21 --- Belt: Thrifted --- Skirt: Handmade --- Tights: Kohls --- Shoes: Payless
Coat: ModCloth
 I'm back in my white tights today... gone is the sunny weather of the past two days, replaced by darkness my old friend (oh man, I totally should not even have made that reference at all).

I woke up this morning with my first sickness of 2011. It's just a cold thankfully and not the flu or anything ultra-nasty like that, but it does make it quite a lot worse that I have to work whilst having my cold. Is this what being an adult is like? Working when sick? I don't want to grow up! I want to be a Toys 'R Us kid!

Wow, another dumb reference. This cold is really messing with my head today.
Yesterday was my day off and I made a trip out to the fabric store to pick up some stuff to make myself some new skirts. I only got around to making one yesterday (the one I'm wearing right now), but I've got two more on the way. The original plan was to just get mustard yellow fabric, but I ended up spying two other prints I knew would make adorable skirts. Can't wait to see how the orange one turns out!